Wednesday, January 27, 2010

card journal ~ a tutorial & a giveaway

*hello! i know i said this tutorial would be on flowers but i thought i'd save that, so...
you will need:
a card
paper{for the inserts}
ribbon
scissors
tape or glue


extras you may like to include:
scrapbooking supplies
fabric
faux flowers
paper cutouts
stickers
paper clips


First, select a card to use for the cover. It can be a store bought card or one someone has given to you{the writing inside will only make the journal more apt to be cherished}.

Then collect 2 or 3 pieces of paper, i used white paper but you could use any variety of colours or textures.

Fold it then cut in strips to make a double page block.


Fold those pages in half & check they fit snuggly inside you card, leaving about 1/2 cm on each side.

Poke 2 holes through the spine. {I positioned them a little more in the back of the card}

Then thread the ribbon/twine/or string through & tie several knots on the outer side of the journal before finishing with a bow{so even if the bow comes undone, the journal won't}


Cut 2 equal lengths of ribbon & sticky tape or glue these to the inside covers.
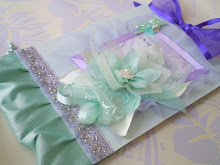

Embellish!!!


& when you're finished you'll have a gorgeous little keepsake journal...


if someone would like this one, id be happy to post it off to a lucky winner...feel free to leave a comment about journalling & i'll choose a winner next Wednesday :) have a very lovely week!

Sunday, January 17, 2010

Flower Making Tutorial ~ Beautiful Bouquets


You will need:
thick craft wire
long nose pliers
an assortment of beads
feathers
scraps of fabric or lace
craft glue{im so sorry i forgot to put this in the picture!}


First cut a length of wire. The length you choose will depend on how long you want your stem to be. At this point it would be good to decide on a vase {or cup as i used} so you know how long you want the wire. {Mine were roughly 25cm in length}
Also, most regular pliers have a wire cutting section, so it shouldn't necessary to buy expensive wire ones.


Then i used round nose pliers to create a loop at one end of the wire. {Again, the one regular pair of pliers may work.}


Now its time to thread the beads onto the wire. Remember these will be the sparkly part of the bouquet so take a moment to decide on a pattern.
{i used about 6-8 silver lined seed beads-not the smallest seed beads because they would not have fit on the 20 gauge wire. Then about 4 or 5 larger glass beads & maybe a filler bead to make it standout.}


The next step is to glue straight across the bottom of your strip of fabric or lace. A key point here is that the wider your fabric, the fuller your flower. i used a piece roughly as long as a ruler or a piece of A4 paper. Again, this is subjective & i never use a tape measure.


Wind the fabric around the stem, pleating as you go. This makes the flower fuller.


Remember, there is a lot of information here but this is a simple fast project. i put alot of extra tidbits about technique because sometimes in the middle of a project i realize with one piece knowledge i could have done something differently or better.
These are the simplest of the flowers in the bouquet, the next tutorial will be of roses & more advanced petals.


Please feel free to leave a link to your finished project or email me a photo if you would like it to be showcased{gowithwisdom@hotmail.com}
Lovely Wishes!

Friday, January 15, 2010

Hello!


This is a new blog


designed


to share


tutorials


with you all. The first one will be of how to make these special flowers!!! Precious Wishes