Saturday, February 27, 2010

beaded letters...


Hi lovelies! here's a simple project i think you'll love! its so versatile & wonderfully sparkly!! you will need:
seed beads{i use silver lined larger ones}
craft wire{make sure the beads can fit on it & also that its sturdy enough to hold the beads in shape}
pliers{i used round nose pliers & regular ones with a wire cutter}


cut a length of wire about 35cm{or as long as your letter will end up}

make a loop at one end, & bend it so its on a right angle with the rest of the wire


thread the beads onto the other end that has no loop


once all the wire is filled with beads, make another loop & turn it to a right angle so it holds the beads securely in place

bend the letter into shape{if you have a letter that needs two pieces of wire to create, thats no problem, just bead the first one, start beading the second, then around the middle point, twist the wires together & continue beading, otherwise you could make a shape such as a heart instead}


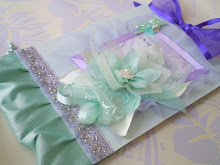
these would be perfect to add to a present{as shown above}


or as a keepsake initial in a table setting


loveliest wishes!!!

Tuesday, February 23, 2010

a few different card journals awaiting postage...


i thought you may like to take a peek at these before i send them on their way :)

have a lovely week!!!

Tuesday, February 9, 2010

Fabric Flowers, tutorial #3


you will need:
fabric
needle
cotton
thread


for this flower i cut a long strip of fabric into 3 distinct petal sizes, using the entire length of material{approximately 6 cm wide & as long as a piece of cardboard.}
cut 5 larger petals-pointed or round, then 5 medium sized petals, then 5 smaller petals...these do not have to be exact, as flaws add to the overall structure of the flower


grab the fabric from one end & pleat in the centre of the first petal


begin stitching the pleat & continue to stitch & pleat up the entire length of petals


this should begin to become a flower shape


& then once the flower is complete you can add a button or beads for the centre


use it to embellish lovely things!


soft petals for delicate things~


have a lovely week!!!


p.s the more layers you add the fuller the flower will become...this was one i got from a fabric shop about a year or more ago, it began my admiration for fabric flowers, made with silk dupion & chantilly lace. so each set of petals{large, medium & small} was cut out in two fabrics that were overlayed for a flower bursting with vibrancy!!

Wednesday, February 3, 2010

A Topiary Tree Tutorial


You will need:
scissors{sorry i always forget those in the photo}
crepe paper{3-5 packets}
ribbons{not essential}
wooden dowelling{a length from Bunnings or a hardware store}
paint
paintbruch
pins
3 styrofoam balls in different sizes
ceramic pot


First poke the styrofoam balls onto the dowelling. The smallest one should go first, medium sized second, & largest last.

Then paint the dowelling. Now its time to make the flowers.

First fold the crepe paper into a stack of 5 or so roughly 7 or 8cm square, enough to cut a flower shape.


i cut my flowers freehand but you can draw one on in pencil as well. alternately, 4 petals or spikey petals will also look wonderful.


Take one flower & pinch it upwards from the centre.
Then add a 2nd & 3rd pinched flower underneath it.


Pin the base of it onto the styrofoam ball.


Colour co-ordinate your flowers until the entire 3 sections are covered.

Then i looped some ribbons & pinned them underneath each tier of the tree.

This would also work very well as a table topper or as a one tiered tree. You could also tie ribbons or crepe paper around the dowelling for a fuller trunk, or cover it with glitter to make it sparkle.


& finally some photos of my finished tree:


oh i nearly forgot, the ceramic tuscan pot was $12 at Bunnings, what an amazing buy!!! i wanted to grow herbs in it! but instead i used rocks from the garden to hold the tree, & covered those with a layer of paper towel to hold the singular petals i cut out & sprinkled over the top!!!

loveliest topiary wishes

Fabric Flower #2

You will need:
cotton
needle
fabric
scissors


First cut a your fabric into a shape like this:

{although you are welcome to cut it much neater :) }
the size of your piece will depend on how big you want your flower to be.

mine was about as long as a piece of cardboard & 5 cm at the narrow end to probably 8cm at the wider end as i wanted a large flower.

these are great to do much smaller though as fabric scraps were what they were first intended for, & alot of scraps seem to be this shape.

Next, fold in half, right side showing.

Then stitch along the seam...

and pull into a flower shape

stitching up through the centre of the flower to hold it taught.do this several times.
Then cut out 3 roundish{more like a square with wobbly edges} shapes that will become the centre of the flower.


Holding one of those shapes in the centre, pinch it upwards to become a shape like this:


then stitch it into the centre of the flower. Repeat this with the 2nd & 3rd shapes.

& voila! a beautiful flower has emerged.

you could attach a pin to the back & wear it in your hair, or as a brooch, or, as i have done, use it to create a marvellous journal.

precious thoughts